 0xC9C3
I recently got my hand on a new small used machine which made me want to redo a part of my
]]>0xC9C3
I recently got my hand on a new small used machine which made me want to redo a part of my homelab once again. Since quite some time i wanted to improve my skills administrating and using kubernetes and had read lots of good things about talos. For my homelab i almost always choose proxmox to virtualize. Since a few years im using terraform / opentofu in production, so why not also in my homelab since it is also meant to hone my skills for real world deployments.
Proxmox and terraform
Looking at the options for terraform providers there are currently two big ones:
Telmate/proxmox and bgp/proxmox.
After some experiments i decided to use bgp/proxmox, since i had a few issues using Telmate/proxmox with my proxmox instance (version 8.2.2). Both don't seem to be really feature complete, but it also seems to be that the proxmox backend does not support some things without ssh and user + password which is pretty bad. If there would be a wishlist for proxmox 9, i'd like to put a feature complete terraform provider integration or an API which make a community developed one possible.
Talos and the image factory
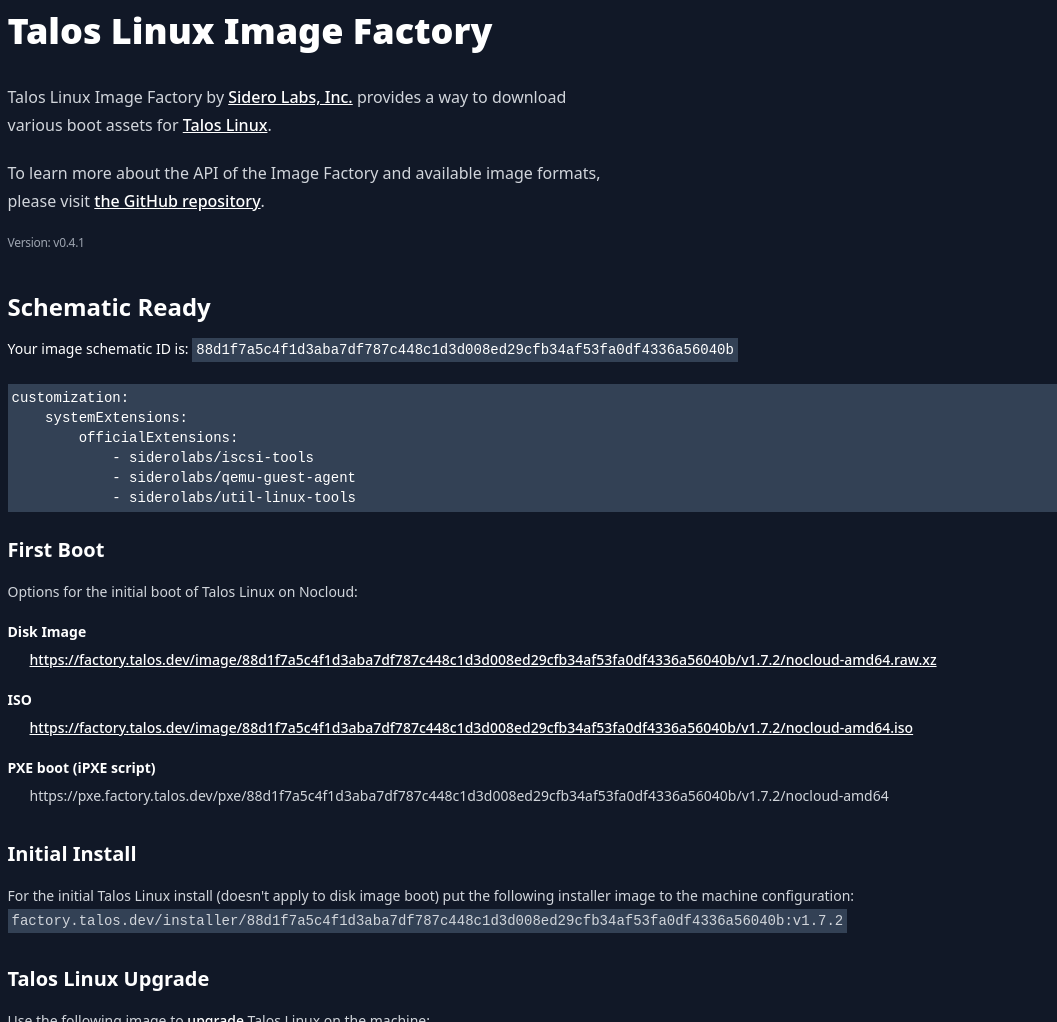
Now for the image, i needed some enhancements which are not included in the default iso or raw image. Fortunately does the talos team provide the image factory service which saved me a some headaches otherwise i would have to use i.e. packer and extend the image or create my own. To create our image we will follow the creation wizard using the options
- Hardware Type: Cloud Server
- Version: 1.7.2
- Cloud: nocloud
- Machine Architecture: amd64
- System Extensions:
- siderolabs/qemu-guest-agent
- For retrieveing the ip when using dhcp
- siderolabs/iscsi-tools
- Needed for longhorn
- siderolabs/util-linux-tools
- Needed for longhorn
- siderolabs/qemu-guest-agent
- Customization
- (empty)
The result should look something like this:
Another great thing about talos is the terraform provider which makes it possible to go from no cluster, to bootstrapped, to provisioned services (using the kubernetes and helm provider) without any manual intervention. For users to of flux and ArgoCD this also means that it is possible to restore a cluster and the infrastructure in one go which is pretty awesome.
storage, networking and services rundown
For storage i used longhorn which means i needed the iscsi and linux tools extension (see the documentation) i picked in the previous paragraph. For networking i used cilium since i heard a lot of good things about it and it provides a LB implementation i can use (https://docs.cilium.io/en/stable/network/lb-ipam/). I disabled hubble in the cilium helm chart configuration and chose neuvector for observability. For CD i chose ArgoCD and i added Harbor as registry but mostly to be used as a pull through cache. Lastly to expose the dashboards i used ingress-nginx mostly to try it out since i almost exclusively used traefik. Since traefik normally has acme already included i also added cert-manager. Finally i also found kubernetes/external-dns which is so far really awesome. It manages your DNS entries in almost all big DNS providers and even in pihole which was perfect for my homelab.
problems and solutions
During the development i had a time where the image factory didn't work which made it so, that terraform plan blocked, since proxmox couldn't read the filename anymore. Fortunately the image factory is opensource as well and i hacked a small docker-compose.yml together to build the ISO locally.
The longhorn service blocks destruction of the cluster in multiple ways. This isn't really a problem since manual deletion of the namespace or rerunning the uninstaller is not too annoying.
The terraform kubernetes provider does not support manifests for CRDs without the cluster being up during planning. This is a big problem since cilium needs the IP pool configured and cert manager needs an issuer. Sure you can configure the cert manager issuer later using flux/ArgoCD and the IP pool too (this would mean to move the ingress-nginx as well otherwise it won't complete the helm install, since no IP can be assigned) but having a single run for creation and deletion would be great. The solution is using the kubectl provider. Make sure you pick the alekc/kubectl one, since the other one doesn't seem too be maintained and you will run into all kinds of problems using it.
outro and backups
So far the cluster has been stable and it was pretty enjoyable to set it up. At the start i allocated to little resources which made me pull my hair out for some time, since some of the error messages weren't really obvious or the nodes just didn't get ready or managed to start kubelet. Otherwise it has been a great experience. I also added velero to push backups of my control plane data to my minio instance. For pvc backups i use longhorn directly.
resources which helped a lot
- Talos on Proxmox by the talos team
- Longhorn Talos support by the Longhorn team
- cilium IPAM by the cilium team
- cert-manager acme documentation by the cert-manager team
- ArtifactHub for helm options and skimming
- Longhorn
- cilium
- cert-manager
- ArgoCD
- external-dns
- ingress-nginx
- neuvector
- harbor (using the bitnami one, since there is also an arm64 image in case i want to move to arm in the future)
Around a month ago i stumbled upon the ergonomic keyboards world. After doing some research, i fell in love with bastardkb's charybdis. I decided to build one for myself. I ordered the pcb and the case since my Ender 5 Pro died around the same time. Otherwise i would have printed the case myself.
You can find the parts in the shop here. There are two guides. One text based which can be found here and an older video guide which does not seem to use some of the same parts as the text guide. Nonetheless, the video part is still useful. It can be found here. Soldering
the components was a bit tricky but i managed to do it. The last time I soldered anything was around 10 years ago, so it is definitely manageable!
Using via with chrome on arch seems to have some permission issues. The workaround is to open your chrome://device-log and check for any permission related errors. Otherwise via will report that it is unable to connect. Once you have changed the permissions on the hid device, via will work fine (i.e. via chmod 777 /dev/hidraw1). The device number (/dev/hidraw1) will vary depending on where and how many devices you have connected.

For the switches I ordered some cherry mx reds from keychron. I'm not sure how happy I am with them yet. The overall build was very fun and I'm happy with the result. I had an issue where i did not properly solder part of the cable and a part of the keyboard was not working. Everything else did work very well. A kind soul on the bastardkb discord helped me out and i was able to fix it.
The device itself is nice so far. I'm still getting used to the layout and the typing experience. Sometimes I accidentally touch the trackball with the palm of my hand. This might be due to the fact that I'm not used to the experience yet. I'm also very far from my normal wpm, but i'm sure that will improve with time.
If you want to build one yourself, I would recommend it. It's a fun project and the end result is very satisfying. You can improve your soldering skills and learn a lot about the components that go into a keyboard.
If you don't want to order the components from the shop, you can find everything you need in the repository, but I'm sure the people from bastardkb would be happy if you could support them.
- the kit https://bastardkb.com/charybdis/
- the github https://github.com/Bastardkb/Charybdis
- the docs https://docs.bastardkb.com/
I had some issues during the configuration so here is how it works:
Head to your authentik instance and create a new Certificate via System -> Certificates -> Generate (or upload if you have one you want to use).
- Set the name and validity
- Remember that you might need to roll the certificate once it expires.
- Download the certificate after generation by opening the accordion and clicking the "Download Certificate" Button
Inside authentik head to Applications -> Providers and create a new Provider.
The Name can be whatever you want it to be.
The Protocol settings need to be the following:
- ACS URL: https://YOUR.SONAR,INSTANCE/oauth2/callback/saml
- callback/saml could also be a different identifer this depends on what you will configure inside Sonarqube
- Issuer: yourissuer
- This is important and you will need to specify this one to Sonarqube later
- Service Provider Bindig: Post
For the Advanced protocol settings you need the following:
- SigningCertificate
- Here you need to pick your certificate you generated earlier
Save your provider. Create an application and assign your provider.
Now head to Sonarqube.
Use the default admin navigation to Administration -> General
- Configure inside General -> General -> Server base URL
- This is important!
Head to Administration -> Authentication -> SAML
Create a new configuration with the following:
- Application ID can be whatever you want
- Provider Name is important and is referred to by the ACS URL parameter above!
- Provider Id needs to be the same as the Issuer or EntityId in authentik
- SAML Login URL needs to be
- https://YOUR.AUTHENTIK.INSTANCE/application/saml/YOUR_AUTHENTIK_APPLICATION_SLUG/sso/binding/redirect/
- Identity Provider Certificate needs to be the content from the certificate file you downloaded in authentik before
- SAML User Login Attribute is
http://schemas.goauthentik.io/2021/02/saml/uidSAML User Name Attribute is
http://schemas.goauthentik.io/2021/02/saml/usernameSAML User Email Attribute is (optional)
http://schemas.xmlsoap.org/ws/2005/05/identity/claims/emailaddressTroubleshooting Tip
You can set the Environment Variable
SONAR_LOG_LEVEL_WEB=DEBUGand will get some good detailed logs about what might have went wrong during authentication.
Remember to remove this once you are done since it does impact performance.
]]>For quite a few years now i always upgraded or rebuilt my work machine to the latest and greatest. This time i decided to try something different. I bought a nice lightweight laptop and began using codespaces for my development. While great, the pricing wasn't really what I wanted to pay for a development environment. So I started looking for alternatives and found coder.
coder is a tool which allows you to deploy your own codespaces like environments which are named workspaces. The workspace deployments are managed with terraform and can be deployed to any cloud provider. This is great because it allows you to scale up and down as needed and does not require to learn a new configuration or templating language. Since i personally don't like AWS and Azure still does not seem to properly support ipv6 (see github actions) I decided to go with hetzner cloud. A good starting point was this template by ntimo. I made a few changes to install most of the tools I regularly use and need like docker, zsh, etc. and it's great to have a workspace which is always available and can be accessed from anywhere. Using the coder cli i can easily connect to the workspace and start working.
For now i'm quite happy how fast the workspaces start and how well they work. I hope to be able to use this setup for a while and plan on creating my own images which include all my favorite defaults.
My current template can be found here
0xC9C3The first tool i&
]]>My current deployments don't meet some flexibility i would like to have in case a provider raises prices, burns down or just doesn't fit my needs anymore. I want to be able to move my infrastructure to another provider without much hassle.
The first tool i'm going to use is terraform. Terraform is a tool for building, changing, and versioning infrastructure safely and efficiently. Terraform can manage existing and popular service providers as well as custom in-house solutions. Currently im using terraform to deploy my infrastructure in Hetzner.
Next on the list is docker. Docker is a tool designed to make it easier to create, deploy, and run applications by using containers. Containers allow a developer to package up an application with all of the parts it needs, such as libraries and other dependencies, and ship it all out as one package. By doing so, thanks to the container, the developer can rest assured that the application will run on any other Linux machine regardless of any customized settings that machine might have that could differ from the machine used for writing and testing the code.
Last but not least is restic. Restic is a backup program that is fast, efficient and secure. Restic should be easy to configure and use, so that in the unlikely event of a data loss you can just restore it. It uses cryptography to guarantee confidentiality and integrity of your data. The location of the data doesn't matter. It can be on a server, on a desktop computer, in a public cloud and on a NAS. Restic is free software and licensed under the BSD 2-Clause License and actively developed on GitHub. I am using backblaze b2 as my backup provider.
Okay, but what about the OS? I'm using Flatcar Container Linux. Flatcar Container Linux is an immutable Linux distribution for containers. It is a friendly fork of CoreOS Container Linux and as such, compatible with it. It is designed for containerized workloads, but also runs systemd and can therefore be used as a drop-in replacement for most legacy Distributions. Flatcar Container Linux is distributed as a single image that can be booted into a live operating system running entirely from RAM. It can also be installed permanently on a hard disk or booted over the network via PXE.
Depending on your needs, you should think about building a custom image i.e. using packer, since depending on the number of nodes you are going to deploy, it can be a bit time-consuming to install all the packages you need.
My current "budget" variant for deploying a new node is the following:
Use the smallest ARM instance available in Hetzner, for monitoring, alerting and to be used as a bastion host. Also it will be used as a IPV4 NAT gateway, since we can save some money by using a single IPV4 address in Hetzner. The rest of the nodes will only be using IPV6 but have more power.
For the docker volumes I use a Hetzner cloud volume which is regularly backed up to backblaze b2 using resticker. The second backup is done using a Hetzner storage box which is synchronized to my main backup machine.
Notifications for SSH logins, failed backups etc are sent to a telegram channel using a telegram bot.
Currently my terraform deployment detects if a restic backup (snapshot) exists and will restore it to the volume if it does (and the volume is empty). This way i can easily restore my data in case of a disaster.
Because of this resilience and ability to "clone" the deployment including the data without much overhead i am pretty confident that this is my favorite deployment so far.
I will see if i can improve it in the future, but for now i am pretty happy with it.
]]>For example, you're on a computer that doesn't have it installed, or you're on a computer that doesn't have a GUI, or you're on a computer that]]>
Sometimes there are situations where you can't use your password manager.
For example, you're on a computer that doesn't have it installed, or you're on a computer that doesn't have a GUI, or you're on a computer that doesn't have a keyboard, or you're on a computer that doesn't have a screen.
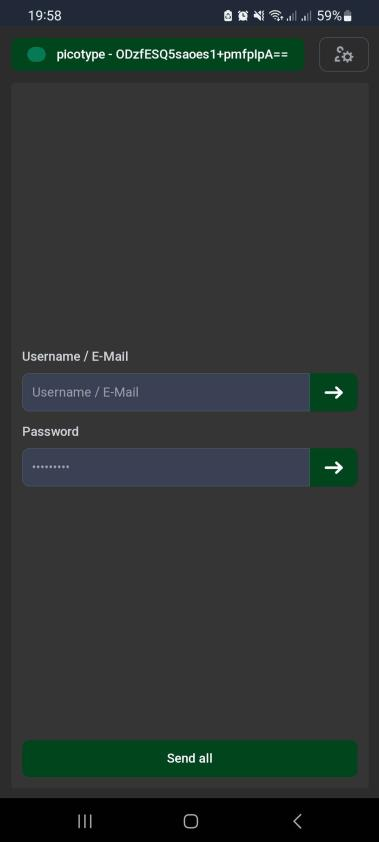
Whichever of these situations you find yourself in, you can use picotype to type your password for you.
This project is in its early stages. It might not work. It might not be secure. It might not be useful.

I'm currently using a laptop with LUKS full disk encryption. Since I don't want to type my password every time I boot, I'm using picotype to type it for me. This is the main use case I'm developing this for. While the laptop does contain sensitive data, I'm not too worried about it being stolen. The contents of the laptop are backed up and probably not that interesting to any three letter agencies.
If your threat model is different, you might not want to send your password keystrokes over BLE, even if they are encrypted.
This project uses the Raspberry Pico W, which is a microcontroller with a built-in Bluetooth Low Energy (BLE) radio.
Before you decide to use this, please read the security considerations section.
Even if you might not be interested in the project, you might like simple the case I designed for it. It needs to be printed and glued together, but it's pretty low profile and fits in my pocket.
For more information, check the repository and the docs.
 0xC9C3
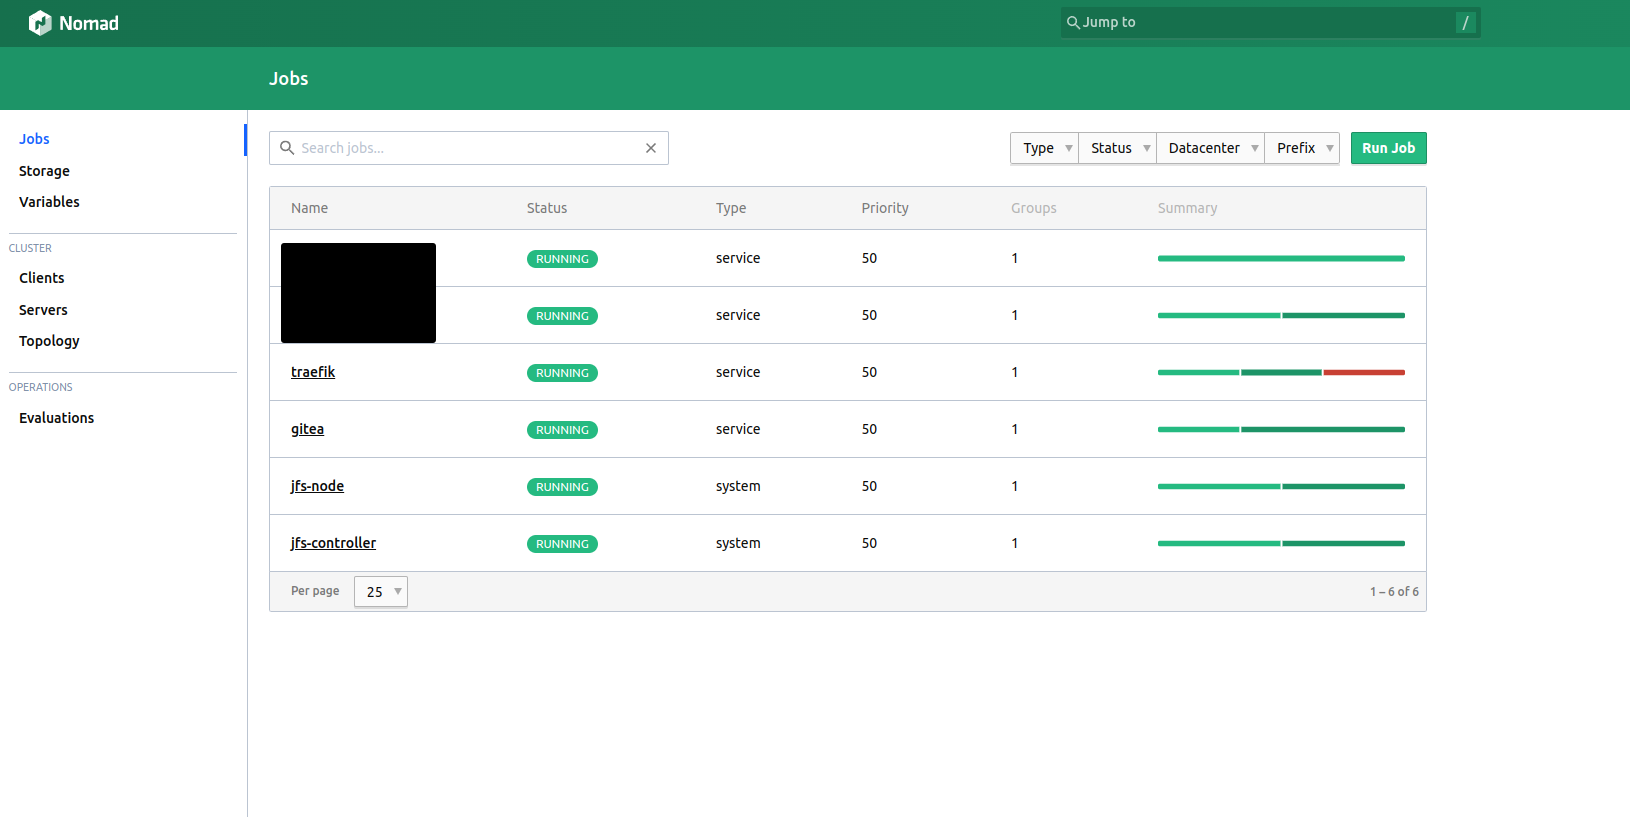
I managed most of my hosted apps in my homelab and on my server using docker-compose files for a long time, since it was easy to use and I could easily backup the data. Updates were easy as well since I could just pull the latest image and restart the container. But a homelab is not a homelab if you don't try new things and so I decided to try out something new. I also wanted to try out Ansible for a long time and so I decided to use it to automate the setup of my new server.
Spoiler: After setting up my homelab I migrated my "production" server to the "Hashistack" as well. You are currently looking at the result of that migration.
Warning: It took me a week on and off to read the documentation for Nomad, Consul, Vault, JuiceFS and to prepare the ansible playbook the way I wanted it to be.
I strongly recommend you take your time.
What my "needs" were
- I want orchestration for my applications and I want to be able to scale them if needed.
- I also want to be able to easily backup my data and restore it if needed.
- I also want to be able to easily update my applications.
- I want to be able to easily add new applications.
Why I chose Nomad, Consul, Vault and not Kubernetes, Docker Swarm, ...
I chose Nomad because it is easy to use and it is very flexible. In comparison to Kubernetes the learning curve is not as steep and it is easier to setup. Consul is used as a service discovery and for service mesh. Vault is used to store secrets and certificates. All three tools work very well together and are easy to use. Some people say Kubernetes compliments those, so I still have the option to switch to Kubernetes if I want to. Docker Swarm is not as flexible as Nomad and I don't want to use Docker Swarm in production.
Why I chose Ansible and not Saltstack, Puppet, Chef, ...
I chose Ansible because it is easy to use and it is agentless. I don't want to install an agent on my server and I don't want to use a master server. While I might use a bastion host in the future, I don't want to use a master server as a single point of failure. The only requirement is python3 and ssh which is already installed on most linux distributions. Ansible also integrates very well with Terraform, which I might use in the future.
Why I chose Traefik and not Nginx, ...
I chose Traefik because it is easy to use, and it integrates very well with Nomad and Consul. It is also very easy to configure and it supports Let's Encrypt out of the box. Traefik also supports TCP and UDP load balancing which is a big plus for me.
Everything else
I chose JuiceFS as a distributed file system for my data. To support JuiceFS i chose Minio as a S3 compatible object storage and redis as a metadata store. Without a distributed file system it would be hard to scale the applications and nomad would not be able to schedule the applications on different nodes. The cluster transport is secured using Wireguard. I chose to use Docker as a container runtime since it is easy to use and I already have experience with it.
Backups
With this setup we need to back up the following things:
- Minio data
basic backup of the data directory alternatively mirror - Redis data
enabling rdb and aof and configure snapshots - Nomad state
create snapshot using the cli - Consul state
create snapshot using the cli - We dont need to create backups for vault, since vault is using the kv storage of consul
Ansible roles
While I won't share my playbooks, since I think everyone should write their own to be able to truly understand what is happening, I will share the roles I used and what they do.
ssh_hardening - Hardens the ssh server and copies the Ansible ssh key to the server.
devsec.hardening.os_hardening - Hardens the system.
hifis.unattended_upgrades - Installs and configures unattended upgrades.
geerlingguy.pip - Installs pip.
geerlingguy.docker - Installs docker.
ansible-consul - Installs and configures consul.
ansible-vault - Installs and configures vault.
ansible-nomad - Installs and configures nomad.
ansible_role_wireguard - Installs and configures ansible.
I wrote my own role for JuiceFS + minio + redis.
Things to consider
If you use Ansible for i.e. job templates you need to properly escape '{{' and '}}' in your templates. Otherwise, the template will be rendered by Ansible and not by Nomad. This is especially important for jobs with secrets.
Low latency is important for almost all the services. If you have high latency between your nodes you might experience problems.
Retrospective
I am very happy with the result. I learned a lot about Ansible, Nomad, Consul, Vault and Traefik. I also learned a lot about JuiceFS, Minio and Redis. I am also very happy with the performance of the cluster. I am able to deploy new applications in seconds, and I am able to scale them if needed. I am also able to easily backup my data and restore it if needed.
While overkill for a homelab and even for my very small production environment, I am very happy with the result. Ansible is invaluable for me and I will use it for all my future projects and work, since it is easy to use and makes provisioning and configuration management a breeze.
Resources
]]>Here is how you can host your own container and package registry]]>
Since I was in need of a cheap private container and package registry, I began looking around for good solutions. While I found some, I was not satisfied with the pricing. So I decided to create my own.
Here is how you can host your own container and package registry for free using gitea and a cheap vps. I'm using a 2vCPU 2GB RAM, 40 GB SSD VPS from Netcup for 3,25€/month. While this is not the cheapest VPS you can get, it is still very cheap, and you get a lot of performance for your money.
Hosting
I won't go into detail on how to set up gitea, since there are already a lot of tutorials out there. Also, you should properly secure your server with at least a firewall and fail2ban.
Here is the full docker-compose.yml file I'm using:
version: "3"

services:
  reverse-proxy:
    image: traefik:v2.7
    restart: always
    command:
      - "--providers.docker=true"
      - "--providers.docker.exposedbydefault=false"
      - "--entrypoints.websecure.address=:443"
      - "--entrypoints.web.address=:80"
      - "--entrypoints.web.http.redirections.entryPoint.to=websecure"
      - "--entrypoints.web.http.redirections.entryPoint.scheme=https"
      - "--entrypoints.web.http.redirections.entrypoint.permanent=true"
      - "--certificatesresolvers.myresolver.acme.dnschallenge=true"
      - "--certificatesresolvers.myresolver.acme.dnschallenge.provider=cloudflare"
      - "--certificatesresolvers.myresolver.acme.dnschallenge.resolvers=8.8.8.8,1.1.1.1"
      - "--certificatesresolvers.myresolver.acme.caserver=https://acme-v02.api.letsencrypt.org/directory"
      - "[email protected]"
      - "--certificatesresolvers.myresolver.acme.storage=/letsencrypt/acme.json"
    ports:
      - "80:80"
      - "443:443"
    networks:
      - traefik
    environment:
      - "CLOUDFLARE_DNS_API_TOKEN=${CLOUDFLARE_DNS_API_TOKEN}"
    volumes:
      - "./docker-compose-data/letsencrypt:/letsencrypt"
      - /var/run/docker.sock:/var/run/docker.sock
  server:
    image: gitea/gitea:1
    container_name: gitea
    environment:
      - USER_UID=1000
      - USER_GID=1000
    restart: always
    networks:
      - traefik
    volumes:
      - ./gitea:/data
      - /etc/timezone:/etc/timezone:ro
      - /etc/localtime:/etc/localtime:ro
    labels:
      - "traefik.enable=true"
      - "traefik.http.routers.gittea.rule=Host(`your.domain.com`)"
      - "traefik.http.routers.gittea.entrypoints=websecure"
      - "traefik.http.routers.gittea.tls.certresolver=myresolver"
      - "traefik.http.services.gittea.loadbalancer.server.port=3000"
      - "traefik.docker.network=traefik"
  watchtower:
    image: containrrr/watchtower
    volumes:
      - /var/run/docker.sock:/var/run/docker.sock
    restart: always
networks:
  traefik:
   name: traefik
As you can see, I'm using traefik as a reverse proxy. Watchtower is used to automatically update the used images. If you take the config as is, you will need to configure traefik with your cloudflare api token or update the challenge and provider. Checkout the traefik docs for that. You should forward port 22 if you want to use gitea as git server too.
Comparison
AWS ECR: ~0.10$/GB/month + data transfer out 0.09$/GB
This is only the container registry. You would have to use something like CodeArtifact to match the features.
GitHub: 0.25$/GB/month + data transfer out 0.50$/GB
For this example I take the literal conversion of 1€ = 1$.
3.25€/month = 3.25$/month
AWS ECR: 0.10$/GB/month * 40GB = 4$/month
GitHub: 0.25$/GB/month * 40GB = 10$/month
And this is only storage. You will also need to pay for data transfer out unless you accept to be vendor locked and even region locked (AWS). I will not calculate this, since it depends on your usage.
Sure you have to manage your own server, but you can also use it for other things. And you can also use it to host your own git server.
Since i'm not using AWS exclusively and don't plan on being locked in on using GitHub Actions, this solution is perfect for me.
This is a Docker image for to easily self-host GitHub actions runners. Hourly builds are available on Docker Hub.
0xC9C3I wanted to self-host GitHub actions runners, but I didn't want to install all the dependencies on my machine. So I created this image. This way I can easily run multiple runner on my server and use it for all my projects and even customize it, by extending this image.
An example of customization is the builder.Dockerfile.
FROM docker:23.0-dind AS docker

RUN cp /usr/local/bin/docker /usr/bin/docker

FROM 0xc9c3/github_actions_runner:latest

COPY --from=docker /usr/bin/docker /usr/bin/docker

ENV RUNNER_ALLOW_RUNASROOT=1

USER root

RUN apt-get update && apt-get install --yes jq \
    && rm -rf /var/lib/apt/lists/*
It uses this image as a base image and installs the jq package to be able to parse the GitHub API response. Also, it copies the docker binary from the dind image to be able to build and push docker images. This is needed because the docker image does not have docker installed. We also use the root user here because we need to be able to communicate with the docker socket.
0xC9C3
I wanted to mirror all my repositories from GitHub to a gitea instance. I found a few tools that do this, but they were either not maintained anymore or not working as expected. So I decided to write my own. The gitea instance is then backed up to my NAS. You can read more about my backup strategy here.
While it is possible to manually mirror all repositories, this is not very convenient. This tool automates the process.
Dependencies
To communicate with the gitea instance, the application uses the gitea api. There are a few crates available for this, but I decided to generate my own using the openapi generator, because most of them are not up-to-date. You can the gitea-rs repository here. The crate still has a few issues using the latest version of the gitea schema, since for example only HTTP Basic Auth is currently supported, because the usage of the identifier "apiKey" for 5 different authentication methods breaks the generator. Also, the crate should be automatically updated using the openapi generator, when a new version of the gitea schema is released.
For the communication to GitHub we use octocrab, since it is rather actively maintained and has a nice API.
To parse the input parameters, we use clap. To parse the config file, we use serde_yaml. For more information, see the Cargo.toml file.
Inner workings
The basic concept consists of two parts: the sources and the targets. The sources are the places where the repositories are mirrored from. The targets are the places where the repositories are mirrored to. Currently only GitHub and gitea are supported as sources and targets.
The application is designed to be run periodically. It will check all repositories of the configured sources and mirror them to the configured targets if they are not already mirrored.
The watcher_interval_ms is the interval in which the application checks for new repositories.
You can check the readme for the details of the sources and target configuration.
Also: The image is available on dockerhub and "weighs" only 7.77 MB! You can use the docker-compose.yml inside the repostiory as a template if you want to check it out.
Closing thoughts
While the tool does need some refactoring, it works for me and unless I have the need for more targets or sources I am probably not going to work much on it.
Automatically updating gitea-rs, mirror tea and publishing it to crates.io and dockerhub is on my todo list.
Thanks for reading and I hope you found it useful.
]]>My backup job runs every night at 3am and backups the following:
- my Google Business account using Active Backup for Google Workspace
- my Google Accounts outside the]]>
I mainly use a RS1221+ carrying 4x 6TB WD Red Plus running in RAID 6 with data protection for my backups.
My backup job runs every night at 3am and backups the following:
- my Google Business account using Active Backup for Google Workspace
- my Google Accounts outside the business account using Cloud Sync
- my publicly and locally hosted services using Active Backup for Business
Afterward I use Hyper Backup to back up most of the data to backblaze b2. The current size of my backup is 701GB. My monthly costs are around 5€, which is incredibly cheap.
The data is encrypted using the inbuilt encryption.
The max number of versions is set to 256, afterward the retention policy sets in and deletes the oldest version.
Once per year I run a full backup to a local disk and store it in a safe place.
This ends up being two "onsite" backups and one "offsite" backup.
While I'm not a big fan of the synology backup solution, it's the best I could find for my use case. The overhead is minimal and the backup is encrypted. For production systems I would recommend using a dedicated backup solution like Borg, restic or Kopia.
I'm not affiliated with backblaze or synology in any way.
]]>Namecheap forces you to allow list every IP that should use the
]]>If you are hosting your own services locally and have the need for Let's Encrypt certificates, you might come across a problem while attempting to solve the DNS challenge using traefik / lego and the namecheap provider.
Namecheap forces you to allow list every IP that should use the API. That is a problem if you don't have a residential static IP and do not want to regularly update your allow listed namecheap IP's.
Solution:
Use a proxy.
Example using Docker:
A prerequisite is to host your own proxy server on a server which has a static IP assigned.
For this example i'm using
3proxyAll you need to do is assign the following environment variables:
HTTP_PROXY
Your proxy connection for HTTP requests.
HTTPS_PROXY
Your proxy connection for HTTPS requests.
NO_RPOXY
All domains, IPs and IP ranges (CIDR notation), which should not be sent through your proxy.
For more information, see the go documentation.
Using docker compose this could look like this:
docker-compose.yml
...
environment:
      - "NAMECHEAP_API_USER=${NAMECHEAP_API_USER}"
      - "NAMECHEAP_API_KEY=${NAMECHEAP_API_KEY}"
      - "HTTP_PROXY=${PROXY}"
      - "HTTPS_PROXY=${PROXY}"
      - "http_proxy=${PROXY}"
      - "https_proxy=${PROXY}"
      - "NO_PROXY=${NO_PROXY}"
      - "no_proxy=${NO_PROXY}"
...
.env
NAMECHEAP_API_USER=your_username
NAMECHEAP_API_KEY=your_api_key
PROXY=http://username:[email protected]:1234
NO_PROXY=172.20.0.0/16
Note:
While possible, i don't recommend to use any public proxies / VPN, because you will fully sacrifice the extra security of the IP allow list.
]]>